Showing posts with label Parlour Level. Show all posts

Wednesday, August 13, 2014

Tiling Update

The tile guys have been busy this week installing the entryway tile, laundry cupboard floor tile and grouting the two upstairs bathrooms. It's not complete yet but here are some progress shots:

Black and white "circulos" cement tile going
down in the entryway

Boring but functional laundry floor

Pretty pennies, grouted but not yet cleaned up

Master Shower, floor tile not yet grouted
but subway is done and drying


Thursday, August 7, 2014

Paint

Who knew that choosing paint was so very difficult?! I thought it would be challenging, I knew there were many many shades of seemingly very similar shades, but, I wasn't prepared for a) how expensive the samples are (Benjamin Moore have recently stopped doing their 2oz sample pots and instead you have to buy a quart for anywhere between $6.99 upwards depending where you buy it) and b) how different the samples look when you put them on the wall surrounded by very white primer and then again once the whole wall is painted. 

Long story short, after painting little squares all over various walls, we have decided to go very neutral pretty much throughout but especially with the living space downstairs to maintain the "modern Scandinavian" feel from the white tinted floor. Now you may look at the colours below and think they are all the same (my husband certainly did!) but I promise you, on the walls, they are very different! Not wanting to be called boring and go all white, we have chosen a very very pale grey for the walls and crown downstairs - BM Winter White, and a slightly darker light grey for the all the trim including windows, shutters, baseboards etc - BM Paper White (anything to avoid the dreaded beigy magnolia feel of the 90's!).

Paper White OC-55
Winter White OC-21

To add a little interest and to tie in the dark from the steel on the garden doors and the staircase we are painting the kitchen island in Ink Black, which is really more of a dark blue/charcoal. The perimeter cabinets will match the trim in Paper White. More of the kitchen inspiration here.

Ink Black
Upstairs will continue the neutral theme with the Paper White in the hallway and the nursery and a slightly warmer shade - Classic Gray OC-23 for the master bedroom. All the upstairs trim will be White Heron OC-57 (I found the go to White Dove far too yellow).

White Heron
Classic Gray
In the guest room I thought Cement Gray 2112-60 was going to be a winner until I painted it on the walls and it read as almost lavender. So just to be difficult, I decided to neutralise the purple with a 50/50 mix of Balboa Mist OC-27 which worked perfectly.

Balboa Mist
Cement Gray
I am still working on the entryway and powder room colours which is driving me a bit mad. Hopefully it will be sorted soon!

Friday, July 18, 2014

Master Bath Tiles cont….Herringbone Floor


We spent many hours this week gettin the tile layout for the master bathroom floor just right. It was very tricky to know exactly how it was going to fall at each corner of the room because of all the angles in the herringbone pattern and because this is not a standard rectangular space so there are a few dreaded "outside" corners to work around. The pattern layout affects the look considerably and after laying it in the way we had drawn on the plans everyone agreed it was actually better turned 90 degrees so the "arrows" of the herringbone ran east west rather than north south.

Here's how it was on the plan:


And here's what we ended up doing (LOVE!!):


Wednesday, July 9, 2014

Master Bath Tiles

Gregory the tiler has been hard at work this week installing the floor and wall tiles in both the upstairs bathrooms. Here is a first look at the carrara venato marble tiles we chose for the master floor. They were all ordered from www.thebuilderdepot.com where I got a good price and am really happy with the quality.

Shower floor 1x1"mosaic 

Underfloor heating for chilly winter mornings

Layout for the bathroom floor 4x12"tile

Thursday, May 29, 2014

We Have Walls!

…Well kind of, and only upstairs. Still, it definitely feels like progress! The sheetrock has started going up in the bedrooms and the upstairs hallway. You can see here on the right the master bedroom has a new wall on the north side. It's so great to really get a sense of the room sizes and layout.  Unsurprisingly, the hallway upstairs feels much smaller, but the nursery and especially the spare bedroom with it's two windows feel lovely and light.

Also in the last week, I got some great deals with the memorial day sales to save on tile. I have now ordered all the subway tiles for the two upstairs bathrooms so as soon as they finish sheet rocking they can begin tiling the shower stalls and walls. Our brand spanking new windows have also finally arrived and are at the workshop being painted so they are also going to be installed over the next couple of weeks. 

The only thing holding up the finishing of the sheetrock is the HVAC installation that is currently ongoing. Finally, it feels like things are moving in the right direction!


Spare bedroom and closet
Nursery looking more like a room


Monday, April 21, 2014

Floors Down, Framing Up

So, where are we? 


Well, we now plywood covering the floors pretty much throughout, the downstairs bathroom has finally been ripped out (good riddance!) the old brass pipes running from the cellar have been replaced with shiny new copper, the old cloth covered wiring has been cleared out and updated in the cellar, we have 2x4's studs up framing out the master bath and all the closets upstairs and the office and finally, we made the decision not to move the column of pipes at the bottom of stairs. 

Office
Master Bath
This last one had us "umming and arring" for many many days but ultimately we came to the conclusion that it was an awful lot of money and way too much risk of disruption for our upstairs neighbours = big headaches for us!


Shiny new copper pipes


Thursday, March 6, 2014

Demolition Begins

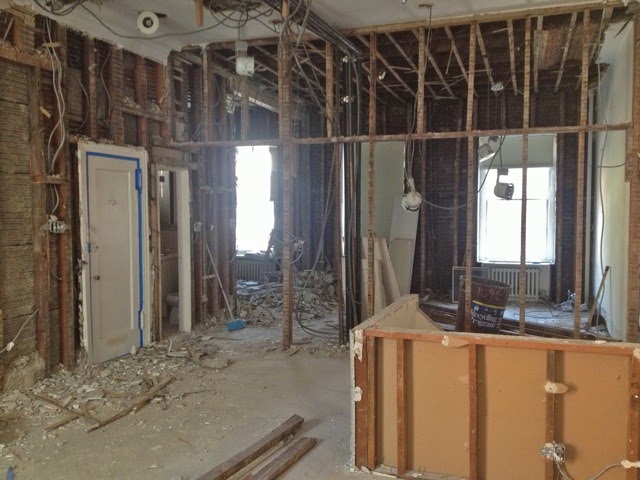
After a couple of days of demo I can't believe how much has changed already. They have begun work on the parlour floor and have already knocked through the big dividing wall that separates the bedroom from the living space and stairs. It so exciting to see the building beginning to open up. Here's the first look photo standing in what was the living room looking through to the bedrooms:


Saturday, March 1, 2014

Starting Point - Upstairs

Here are the before photos from the parlour level floor.

Lets begin with the Living Room:


This lovely room was one of the major selling points of the apartment for us. It benefits from the soaring high ceilings of the parlour level and 2 huge windows that over look the garden. It also has a marble fire place which, though the surround is not really to our taste, (we'd prefer something a little lighter and less morbid looking) it makes an awfully cosy fire in the winter. We decided that this room would become our master bedroom after much (like 3/4 of a year) agonising over whether or not we wanted to open up the upstairs and have our living space take advantage of the high ceilings and light, we concluded that ultimately, it's best to have the living space downstairs with direct access to the garden and the bedrooms all upstairs.

Laundry Room:


Just off the living room is a small annex that contained a washer and dryer and lots of shelving and hanging space. When we first moved in I was in absolute heaven having dealt with the typical New York way of shared or public laundry facilities for the previous four years. This laundry room was particularly luxurious with all it's space for hanging and folding but we thought the space could be better used. It will now be reborn as our new master bathroom. However, we are certainly not sacrificing having a w/d in the apartment and are relocating them to a new cupboard between the two other bedrooms on this floor, a little compromise on space for laundry but the huge advantage of a new third bathroom that is ensuite to our bedroom.

Small Spare Bedroom:


This room is a very compact 9x9' and for the last year has been a perfect space for me to paint in. However, it would make a very small bedroom and I also cannot fail to point out the window. Yes, it is a window, despite not being able to see through it. My guess would be that it's never been cleaned and it is pretty impossible to clean as, like all the windows on this level, there is a separate storm window on the outside. Coupled with the fact there is the A/C unit bolted in place you can't open or close it, or get to the grimy space between the 2 layers of glass. Not ideal!


The floor around the radiator is also in pretty dire condition.

Main Bedroom:


This is certainly one of the nicest rooms of the apartment and the one we slept in. It gets lovely morning light and has a large double wardrobe. Speaking of which, here is a great illustration of how contrasting mine and my husbands approaches were to this renovation... one day we were trying to find ways of reducing the scope of work and he suggested leaving this closet as is. I pointed out to him that the doors on the upper cupboard didn't fit the cut out and that they are also hung unevenly and therefore impossible to open and close. He looked at them, shrugged and asked why it mattered when we don't use them everyday. This did not sit well with my perfectionist tendencies. Thankfully, we have both come a long way in the last 12 months!

Bathroom:


Another cramped, beige, dated bathroom. The tub/tile started leaking a couple of months before we moved out creating a puddle and peeling plaster on the ceiling of the office underneath. Time to renovate!